Difference between revisions of "Facebook integration"
m (Tag: visualeditor-switched) |
m (Tag: visualeditor) |
||
| Line 2: | Line 2: | ||
== Step by step Setup == | == Step by step Setup == | ||
| − | # Go to https://developers.facebook.com/?advanced_app_create=true | + | # Go to https://developers.facebook.com/?advanced_app_create=true You should see windows as on Step 1 image. Submit "Company" field with your company name, read ''Facebook Platform Policy'' and ''Facebook Privacy Policy'', click ''Yes'' if you agree. |
| − | + | ||
| − | |||
# (This Step is for not verified ''Facebook'' accounts) Choose correct country prefix and fill form with your phone number. | # (This Step is for not verified ''Facebook'' accounts) Choose correct country prefix and fill form with your phone number. | ||
a) Click "Send as Text" | a) Click "Send as Text" | ||
| + | |||
b) In ''Confirmation Code'' enter code that you receive on your Phone. | b) In ''Confirmation Code'' enter code that you receive on your Phone. | ||
| + | |||
c) Press ''Next'' button. | c) Press ''Next'' button. | ||
# On your webbrowser should appear popup windows with information as on Step 3 image. | # On your webbrowser should appear popup windows with information as on Step 3 image. | ||
Revision as of 13:57, 28 December 2016
Facebook integration - module of Titan that brings possibility of using Facebook accounts on your website.
Step by step Setup
- Go to https://developers.facebook.com/?advanced_app_create=true You should see windows as on Step 1 image. Submit "Company" field with your company name, read Facebook Platform Policy and Facebook Privacy Policy, click Yes if you agree.
- (This Step is for not verified Facebook accounts) Choose correct country prefix and fill form with your phone number.
a) Click "Send as Text"
b) In Confirmation Code enter code that you receive on your Phone.
c) Press Next button.
- On your webbrowser should appear popup windows with information as on Step 3 image.
- On next step, fill textbox with your App name and enter your contact e-mail.
- You Facebook App Dashbord appear. Copy your App ID. (Step 5 image - marked with red)
- Go to Titan Admin Panel --> Website -->Settings --> Facebook Tab and past copied App ID into Facebook App ID field.
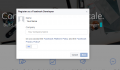
Step 1
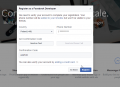
Step 2
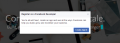
Step 3
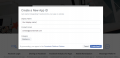
Step 4
Step 5

Step 6


