Difference between revisions of "Facebook integration"
m (Tag: visualeditor) |
m (Tag: visualeditor) |
||
| Line 4: | Line 4: | ||
Follow the instructions below to complete your Facebook integration: | Follow the instructions below to complete your Facebook integration: | ||
| − | 1.Go to https://developers.facebook.com/?advanced_app_create=true | + | 1.Go to https://developers.facebook.com/?advanced_app_create=true You should see windows as on Step 1 image. Submit "Company" field with your company name, read ''Facebook Platform Policy'' and ''Facebook Privacy Policy'', click ''Yes'' if you agree. |
| − | + | 2. Click "Create App ID" | |
| − | + | 3. On next step, fill textbox with your App name and enter your contact e-mail. | |
| − | + | 4. Facebook App Dashbord appear, Go to ''App Review'' and Click YES, below "Make [Your App Name] as Public?" | |
| − | + | 5. Go to Facebook App Settings - | |
| − | + | * Click "Add Platforme" Choose "Web", fill Website URL with your domain. | |
| − | + | * In Facebook App Settings enter value in App Domains as your website domain. | |
| − | + | 6. Go to ''Titan Admin Panel --> Website -->Settings --> Facebook'' Tab and past copied App ID from Facebook App Settings into ''Facebook App ID field.'' | |
| − | |||
| − | |||
| − | |||
| − | |||
| − | |||
| − | |||
| − | 5 | ||
| − | |||
| − | |||
| − | |||
| − | |||
| − | |||
| − | |||
| − | |||
| − | |||
<gallery> | <gallery> | ||
Revision as of 14:43, 28 December 2016
Facebook integration allows you to use Facebook Login and advertise Facebook advertising feature on your website.
Setup instructions
Follow the instructions below to complete your Facebook integration:
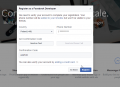
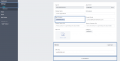
1.Go to https://developers.facebook.com/?advanced_app_create=true You should see windows as on Step 1 image. Submit "Company" field with your company name, read Facebook Platform Policy and Facebook Privacy Policy, click Yes if you agree.
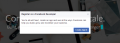
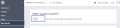
2. Click "Create App ID"
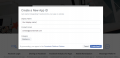
3. On next step, fill textbox with your App name and enter your contact e-mail.
4. Facebook App Dashbord appear, Go to App Review and Click YES, below "Make [Your App Name] as Public?"
5. Go to Facebook App Settings -
- Click "Add Platforme" Choose "Web", fill Website URL with your domain.
- In Facebook App Settings enter value in App Domains as your website domain.
6. Go to Titan Admin Panel --> Website -->Settings --> Facebook Tab and past copied App ID from Facebook App Settings into Facebook App ID field.
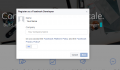
Step 1
Step 2
Step 3
Step 4
Step 5
Step 6

Step 7


