Difference between revisions of "Google integration"
(Created page with "thumb '''Google integration''' allows you to use Google Login on your website. == Setup instructions == Follow the instructions below to complete you...") (Tags: Mobile edit, Mobile web edit) |
m |
||
| Line 21: | Line 21: | ||
<gallery> | <gallery> | ||
| − | File: | + | File:g1.png|Step 1 |
| − | File: | + | File:g2.png|Step 2 |
| − | File: | + | File:g3.png|Step 3 |
| − | File: | + | File:g4.png|Step 4 |
| − | File: | + | File:g5.png|Step 5 |
| − | File: | + | File:g7.png|Step 6 |
| + | File:g6.png|Step 6 | ||
</gallery> | </gallery> | ||
Revision as of 13:05, 12 November 2020

Google integration allows you to use Google Login on your website.
Setup instructions
Follow the instructions below to complete your Google integration:
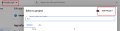
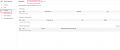
1. Go to Google Developer Console - https://console.developers.google.com/ and create new project.
2. Make sure that you have selected just created project.
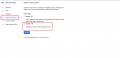
3. Go to Credentials page.
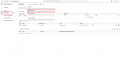
4. Choose OAuth consent screen tab, and set Application Name and in Authorised domains add your domain. Save settings
5. Go back to Credentials tab and Create OAuth client ID Credentials
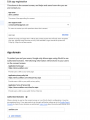
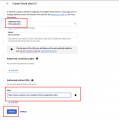
6. Choose Web application, set name, and add in Authorised redirect URIs this url: http://www.your_domain(e.g. usetitan.com)/Handlers/Utils/GoogleOAuth.ashx
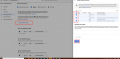
7. Create credentials and copy Client ID and client secret to Admin Panel -> CPA/GPT -> Google reviews -> Settings tab
Step 1
Step 2
Step 3
Step 4
Step 5
Step 6
Step 6


