Difference between revisions of "Login Ads"
(Created page with "thumb|Turn on Login Ads thumb|Settings thumb|New Campaign File:LoginAdsHistory.png|thumb|His...") |
m (Tag: visualeditor) |
||
| Line 1: | Line 1: | ||
| + | '''Login Ads -''' advertisements that are displayed upon each login to Titan Script. | ||
| + | |||
| + | == Enable/disable == | ||
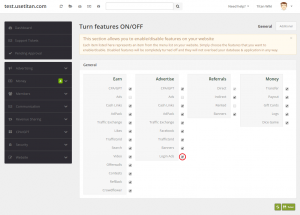
| + | To enable Login Ads, go to ''Admin Panel → Website → [[Turn Features ON/OFF]]''. | ||
| + | |||
| + | == Settings == | ||
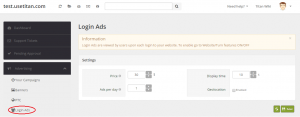
| + | Go to ''Admin Panel → Advertising → Login Ads''. Set the price, display time, how many Login Ads can be purchased per day and whether [[Geolocation]] is enabled. | ||
| + | |||
| + | == Advertise == | ||
| + | |||
| + | === New Campaign === | ||
| + | This process is the same for both users and Titan Administrator. Go to ''Titan Script → Advertise → Cash Links → New Campaign'' | ||
| + | # [[Validate URL]] | ||
| + | # [[Geolocation|Add Geolocation]] | ||
| + | # Press ''Send'' to create the campaign. "The advertisement has been successfully created. It will be available once it's approved by the administrator" message will be displayed (''See [[Approving Campaigns]]''). | ||
| + | |||
| + | === History === | ||
| + | All created campaigns are displayed in a table, where users can follow their progress. | ||
| + | |||
| + | ===== Status ===== | ||
| + | * Awaiting approval - newly created campaigns require Titan Administrator's [[Approving Campaigns|approval]]. | ||
| + | * Active | ||
[[File:LoginAdsON.png|thumb|Turn on Login Ads]] | [[File:LoginAdsON.png|thumb|Turn on Login Ads]] | ||
[[File:APLoginAds.png|thumb|Settings]] | [[File:APLoginAds.png|thumb|Settings]] | ||
[[File:LoginAdsNewCampaign.png|thumb|New Campaign]] | [[File:LoginAdsNewCampaign.png|thumb|New Campaign]] | ||
[[File:LoginAdsHistory.png|thumb|History]] | [[File:LoginAdsHistory.png|thumb|History]] | ||
Revision as of 12:28, 13 June 2016
Login Ads - advertisements that are displayed upon each login to Titan Script.
Enable/disable
To enable Login Ads, go to Admin Panel → Website → Turn Features ON/OFF.
Settings
Go to Admin Panel → Advertising → Login Ads. Set the price, display time, how many Login Ads can be purchased per day and whether Geolocation is enabled.
Advertise
New Campaign
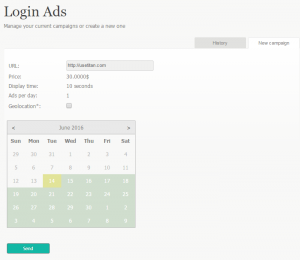
This process is the same for both users and Titan Administrator. Go to Titan Script → Advertise → Cash Links → New Campaign
- Validate URL
- Add Geolocation
- Press Send to create the campaign. "The advertisement has been successfully created. It will be available once it's approved by the administrator" message will be displayed (See Approving Campaigns).
History
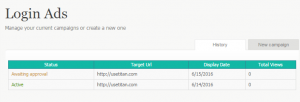
All created campaigns are displayed in a table, where users can follow their progress.
Status
- Awaiting approval - newly created campaigns require Titan Administrator's approval.
- Active


